

All recent programmable devices by MKT are equipped with an Ethernet port and an integrated web server.
In some cases, besides the web server (HTTP server), there is also a 'remote display' client and/or server
integrated in the firmware. This can be used to operate the device with a remote display / operator panel.
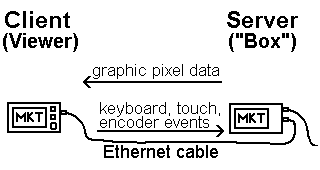
The main reason to separate the display (client aka "viewer") from the programmable device (server)
is the multitude of field bus interfaces which may have to be connected to the server (various CAN interfaces,
RS-232, LIN, GPS receiver, Ethernet, and -future plan- CAN-FD, Flexray,...). With the separation between
display (client) and programmable device (server), all those buses will be connected to the server,
which is mounted in the trunk, under a seat, etc. The remote display only needs an Ethernet connection.
Dedicated displays (planned for 2017) will even be powered over Ethernet, so there is only one cable
between display and server, and no need for an extra power connection to the display.
Remote Display Connection via Ethernet (LAN)
The 'remote display' may be a PC, but it is usually an extra device by MKT with Ethernet.
Some devices also support the standard VNC protocol, but for complete remote display/control, a custom
protocol by MKT (based on UDP) is used between server and client. Since 2016-05, the MKT-View IV has both
a client ("viewer") and a server built inside, so two of those MKT-Views can be connected via LAN
to show the same screen content: The server shows its own framebuffer on its local display, and the
remote display shows the same (a few milliseconds later).
Remote display configuration
In a dedicated 'remote display' (viewer), the remote display protocol is enabled per default,
so you don't need to configure anything on that side.
In devices which have an own integrated display (like MKT-View IV), neither the remote display client nor server
are enabled per default. So to use them, you need to enable the protocol in the device setup, as described below:

|
→
|
 Main system menu
 EXIT !
 Load program from FILE
 Transfer via CAN = OFF/Auto
 Other transfers ... ▶
 Audio Recorder
 ...
 Network Setup
 Remote Display Setup ... ▶
 ...
|
|
→
|
Remote Display Setup (2)
 Save and EXIT
 Enable VNC/UDP SERVER = 0
 Enable VNC/UDP VIEWER = 1
 VNC/UDP server state = 0
 VNC/UDP client state = 0
 VNC/UDP frames sent  = 0
 VNC/UDP frames rcvd  = 0
 ...
 See also: Network setup
|
|
Remote Display Setup in an MKT-View's system menu.
In this example, only the built-in viewer (client) is enabled.
Standard VNC Server (Virtual Network Computing via TCP/IP)
Besides MKT's own 'remote display' protocol (which is actually based on VNC but uses UDP as the transport layer),
a few devices also contain a tiny VNC-compatible server. Its frame update rate is less than with the UDP-based
remote display protocol, because it cannot use the optimized compressed framebuffer transfer and suffers from
the TCP/IP overhead, but in a few cases you may want to use it for remotely accessing the device.
- Note
- Unlike MKT's UDP-based remote display protocol, the standard VNC server does not support audio,
does not support the display's rotary encoder (with pushbutton), and a few other special functions !
To activate the VNC server in the MKT-View (III,IV), enter the device's "Network Setup", and set the 'VNC server'
port number to nonzero. The default VNC/RFB (Remote Framebuffer) server would be 5900.
For security reasons, in devices with an 'own' (internal) display, remote operation via standard VNC
is disabled by default !
If there is no field labelled 'VNC' in the device's Network Setup (somewhere under 'TCP Server Ports'),
the firmware does not support standard VNC (via TCP/IP) but "only" MKT's adaption of VNC, which uses UDP
as the transport layer.
Details about the MKT-View's Network Setup, and about remote control via web browser can be found here .
-
See also:
-
Overview (programming tool) , file transfer via XMODEM /
YMODEM, System Menu and Setup,
Remote control without Ethernet (via CAN, using the "Text Terminal" im the programming tool).