
 (only available for certain terminals with 16- or 32-bit CPU)
Scope
Installing an external font editor
Usage of the external font editor
How to use your own fonts in the terminal application
A demo program with user-defined fonts
See also:
At the time of this writing, user-defined fonts were supported by the following
terminals...
- IPE-VIEW
- MKT-VIEW with CANdb support (including MKT-View II, III, IV)
- UPT-Mobile (alias MKT-View with CANopen V4)
The feature matrix will show you if "your" terminal
supports user defined fonts. A few fonts are provided in the installation
package of the programming tool. Check the readme-file in the
"fonts" folder.
Note: Don't forget to include the fonts in your email attachment when
sending an application to a customer, if the application relies on non-standard
fonts ! We often received applications from developers which we couldn't
test because the font-files were missing.
The next chapters show how to create and use user-defined fonts.
back to top
For good reasons, the font editor utility is not a part of the terminal
programming tool. If you want to define your own fonts (or "characters")
for the terminal, follow these steps:
-
Download the latest release of the font editor utility from
MKT Systemtechnik.
-
Install the font editor into the following directory (otherwise you must
modify the path to the font editor manually in the programming tool)
c:\CanTermFontConverter\FontCvt1.exe
-
Start the terminal programming tool
-
Switch to the "General Settings" tab
-
Click into the "directories" table and scroll it down until you see the entry
"FontEditor".
-
In the data field of this table entry, check the complete path and filename
of the font editor:
c:\CanTermFontConverter\FontCvt1.exe
-
Make sure the
"Fonts" entry in the directory table contains
a complete path to your (TERMINAL-)fonts directory. This directory was created
when the terminal programming tool (not the font editor!) was installed.
Example:
c:\CanTermProgTool\fonts
-
Check if you can launch the font editor from the terminal programming tool's
main menu:
"Tools" ... "Run Font Editor"
back to top
To launch the font editor from the terminal programming tool, use the main
menu: "Tools" ... "Run Font Editor". A list box will appear, asking you which
font shall be edited. Select a font and click "OK". If properly installed,
the font editor will start and load the font from a binary file (which is
in the "fonts" subdirectory).
Now modify the font as explained in the documentation of the font editor
utility. Study the font editor's help system for more info. If the editor
is properly installed, there will be an icon for the manual in the windows
start menu ("Start"..."Programs"..."CAN Terminal Tools").
After modifying the font, save it from the font editor (either under the
same old name, or with a new filename if you want to keep the old font as
well as the new font).
After closing the font editor, the terminal programming tool will automatically
load the modified font into its memory. It will NOT automatically upload
the new font into the terminal ! More on uploading fonts in a later chapter.
More info about the font editor and important "legal terms" will be
available in the font editor's directory after installation !
back to top
-
If needed (i.e. if you cannot find a suitable font in the programming tool's
fonts directory), produce your own font(s) with a simple
"paint" program, and convert them with the external font editor
or font conversion tool.
From the font editor, save the *.fnt file in the programming tool's
fonts directory.
-
Declare all fonts which shall be used by your terminal application ("terminal
program"). From the tool's main menu, select:
"Tools" ... "Replace user-defined fonts". A list of up to ten user-defineable
fonts will appear; all entries will show "User Font #X (unused)" if you have
not loaded a font yet. The font list also shows you how much memory is left
(in the terminal) where fonts can be loaded into. Usually, 128 kByte can
be used for user-defined fonts. Be sure not to exceed this limit ! The
programming tool does not know exactly how much font memory is available
in the terminal, so leave a few kBytes for safety.
-
In the user font list, click on the font which shall be loaded (or replaced).
The selected item will be marked with blue color. Then click "OK".
-
A file selector window will appear, titled "Import user defined FONT from
binary file". There is a subdirectory named "Fonts" where a few fonts are
already present. Select the font which you want to use in your application,
then click "Open" ("Öffnen" on PCs with german windows installation).
If the font's file name is longer than 8 characters, forget it, or rename
it. A font file name must never be longer than 8 characters ! No spaces
within filenames (even though a well-known "operating system" allows it)
!
-
After loading some user-defined fonts as described in the previous steps,
you can use them. Switch to the "display page" definition tab and insert
a new text line. Open the font selection list (on the right side, under "display
line properties"). The fonts are numbered from 0 to 19. Fonts #0 to #9 are
the "fixed" fonts in the terminal, fonts #10 .. #19 are the user defined
fonts. You will see the names of your user-defined fonts in this list also.
Font Number #10 in a display page definition is always the FIRST(!) USER-DEFINED
font. You cannot replace fonts #0 to #9, or any font above #15 because
those fonts are located in the firmware memory (which cannot be modified).
Select font #10 (which may be named "Mighty64" or whatever), and watch the
effect in the simulated LCD window.
-
To insert characters from symbol fonts (without standard ASCII characters),
use a BACKSLASH-x sequence (with two-digit hexadecimal codes for each
special character) as explained here.
For example, use the font table to insert any character, even if you don't know its code:
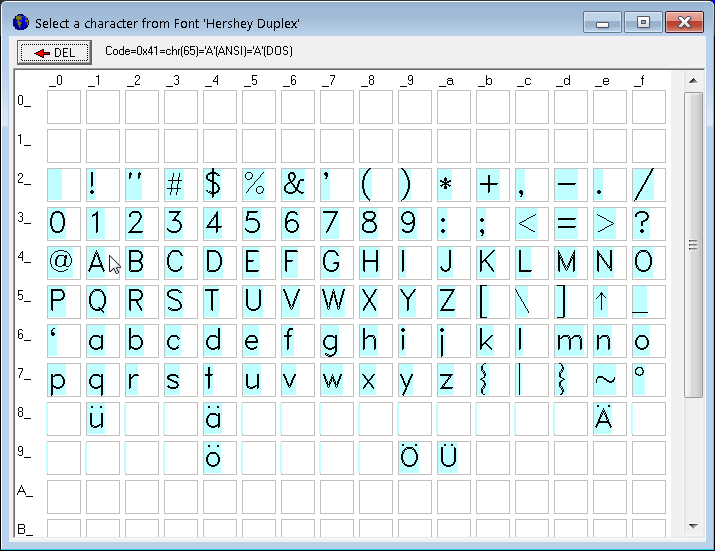
(click into the font matrix to append a character to a backslash-x sequence)
-
Because uploading fonts into the terminal is quite slow, you only have to
upload the fonts into the terminal once (as long as the font
list is not modified, of course !). To upload the fonts into the terminal,
use the function "Transfer" ... "Update USER-DEFINED FONTS via serial port".
The fonts are located in a different area of the terminal's FLASH memory,
so it won't be erased when you delete or upload the terminal
application.
Notes:
-
The user-defined fonts will not be loaded into the terminal automatically
whenever you upload your application !
-
A font file name must never be longer than 8 characters, and it must not
contain spaces !
-
A few "prepared example fonts" will already be in the fonts directory. Beware:
Some of these fonts don't contain all possible 256 character codes, to save
memory. A list of the "sample fonts" is in
?\fonts\readme_fnt.txt .
-
There is a demo program which uses the "sample" defined fonts (FontDemo.cvt).
A few "tricks" used in that demo are explained in the
next chapter.
-
Because the user-defined fonts occupy a lot of disk space, they are NOT saved
as part of the terminal application (in a *.cvt file). If you send a terminal
application to another customer, make sure to send him all required
user-defined FONTS as well (all *.fnt files in the "
fonts"
directory which are used by your application).
In very old decives (UPT-515 and MKT-View I), user-defined fonts could only be uploaded
via the serial port. Fortunately, those days are over, and in modern devices,
you have a choice of different ways to upload the required fonts:
- For the sake of compatibility, the programming tool still supports uploading fonts via RS-232
- Wherever possible, use a 'quicker' method, for example CAN or LAN (Ethernet)
See also: File transfer utility (integrated in the programming tool).
Load the file "FontDemo.cvt" from the "programs" directory
of the programming tool.
-
Note:
-
Though the *.cvt does not contain the actual font data, the programming tool
automatically loads the fonts because the names of the user-defined fonts
are embedded in the *.cvt files, so the tool knows how to load the fonts
from the "
fonts" directory.
In the simulator, a screen like this will be displayed:
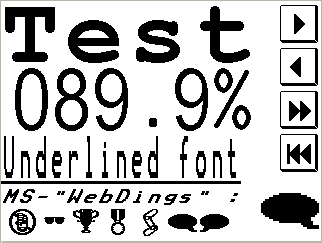
The fonts used on this page are "Mighty64" (64*64 pixels), "BigDig40" (digits
and percent character only), and the symbol font "Webd3232" (32*32 pixels,
compatible with Microsoft's "Webdings" fonts
(c) Microsoft Corporation).
The "VCR-style" buttons on the right side use single characters(!) from the
"Webd3232" font. A single character can be referenced by a decimal character
code ("ANSI" code). For example, look at the sourcecode for the upper button:
\btn(40,40,$002,"\chr(52)",59,g(pn+1))
The font assigned to this display line is "Webd3232". Instead of a normal
text for the graphic button, a backslash sequence is used for the button
text. The backslash sequence
\chr(52) means "print the character with the code 52
from the current font". The result is a filled triangle (which is the character
#52 defined in Webd3232).
To have code numbers of all characters in a particular font at hand (especially
for "Symbol" fonts), use the external font
editor to produce a "font table" as a bitmap file which you can print
on paper. Sixteen characters are displayed in a row, so you can produce a
table like this from your user-defined font:
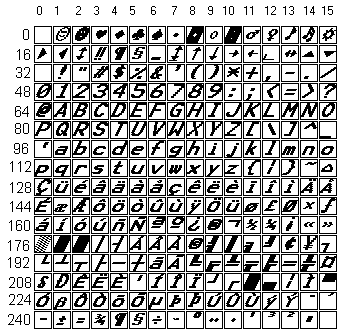 (sample font table)
To retrieve the decimal code of a single character, add the "row" and
"column" values. Example for this font (which uses the DOS charset,
not ANSI): Copyright-character = chr(176+8) = chr(184).
"Windows", "True Type Fonts", "Webdings", "Windings" (c) by
Microsoft Corporation.
For other legal terms, see main manual.
Last modified: 2019-01-30 (YYYY-MM-DD)
back to top