

A few terminals with Ethernet adapter and TCP/IP protocol stack also support
UDP (User Datagram Protocol).
By the time of this writing, it wasn't clear yet how the display application
could communicate via UDP - but most likely, there will be a set of
interpreter commands and function for this purpose. Thus,
the following overview describes -more or less- the planned
functionality. Please ask the software development engineer (Mr. Wolfgang
Buescher) for details if you need them ...
See also (links to other documents):
The User Datagram Protocol (short: UDP), is a relatively trivial, connection-less protocol. For general information on UDP, search the internet, or read this Wikipedia article.
UDP belongs to the 'Internet Protocol Suite' - but it must not be confused with TCP/IP. UDP is much simpler than TCP, which is the reason why UDP is sometimes used for field-bus communication over Ethernet. (in fact, the programmable devices by MKT can only use UDP "over Ethernet", nothing else, since there is no PPP-, nor SLIP protocol implemented in these devices).
Furthermore, in contrast to a fully fledged UDP implementation, this one is limited to a maximum blocksize of one Ethernet frame, thus the maximum 'net data size' is something near 1472 bytes per packet (size of one Ethernet frame minus IP- and UDP headers). In the author's opinion, this limitation is not too severe, because to replace CAN by UDP, a maximum "message" size of 1400 bytes (netto) should be sufficient - especially when compared with the 8-byte data field in a CAN message. Fragmentation of UDP packets would make the firmware too complicated, and require a lot of RAM to re-assemble the received fragments.
Mapping data ("values") to and from UDP packets is done by virtue of the terminal's built-in command interpreter. In fact, the same subroutines are used which also map and unmap CAN 'signals' from ("CANdb-") messages. Using the terminal's 'programmable events' (or, in future, the terminal's scripting language), you can even implement your own, UDP-based protocol to communicate between two devices via Ethernet (LAN).
Note: Sending and receiving UDP packets is only possible with the real hardware - the simulator in the programming tool doesn't support UDP (at least not yet.... 2010-05-25).
Work in progress ! ...
The following list is only informal, because by the time of this writing, the implementation of these functions was not finished yet (2010-05-25) !
Up to four different UDP 'channels' (all with different port numbers, and/or remote IP addresses) can be used. The channel number is passed as a formal array index after the keyword "udp". Like array indices in most (better) programming languages, these channel numbers begin at zero. If the UDP channel number (<channel>) is omitted, the program uses the first channel (with index zero).
udp[<channel>].conn(
< argument list > ) : Defines the UDP communication parameters
("connection parameters").ma= 'my address' (local IP address). This is an IP address
in the usual four-byte decimal notation (see examples further below). Or
one of the special tokens which will be defined here in future (like "IP_ANY").
In most cases, 'my address' is not specified, and the program will use the
device's fixed IP address as configured in the
terminal's built-in system menu
(look for the chapter titled Network Setup).mp= 'my port number' (local port number). Must be a 16-bit
integer in decimal notation. This port number will be copied into the UDP
header's "source port number" field (16 bits) when sending an UDP packet
with the udp.send function, explained further below. If not specified, the
following default UDP port numbers will be used:ra= 'remote address' . This is the IP address of the
'remote end' in the usual four-byte decimal notation. If not speficied, the
udp.send function (see below) will send broadcasts. For diagnostic purposes,
the actually used IP can be retrieved with the function
udp.ra (explained further below).rp= 'remote port number' . Must be a 16-bit integer in
decimal notation. Usually not specified; which means this
UDP channel may receive datagrams from any port number. Do
not confuse this port number with the 'destination' port when sending packets
with the udp.send function, which is explained further below.udp[<channel>].send(
[<optional arguments>, ] < data field > ) : Sends a UDP packet
("datagram"). ra= 'remote address' . This is the IP address of the
'recipient' in the usual four-byte decimal notation. If not speficied, the
udp.send function (see below) will use the value specified in the udp.conn
command (see above), send broadcasts. If "ra" isn't specified there as well,
the udp.send command will send a local broadcast .rp= 'remote port number' . Must be a 16-bit integer in
decimal notation. If not specified, the udp.send command will use the 'remote
port number' which has previously been defined in the udp.conn command for
this channel. udp[<channel>].rcvd
: Interpreter function. Checks for reception of another UDP packet
matching this channel's parameters (especially the port numbers). udp[<channel>].rcnt
: Interpreter function. Returns the number of successfully received
UDP packets for this channel.udp[<channel>].ra[<0..3>]
: Interpreter function. Returns the n-th byte (n: 0 .. 3) of the
channel's 'remote IP address'. For example, if channel #2 is configured to
communicate with a remote IP address 192.168.0.200, udp[2].ra[0] is 192,
udp[2].ra[1] is 168, udp[2].ra[2] is 0, and udp[3].ra[0] is 200 . This
function may be helpful for a 'diagnostic screen' with the UDP communication
parameters. As long as the channel is not connected, these values may also
be written (modified). Also see notes about udp.conn
.udp[<channel>].rd.b[<N>]
: This interpreter function reads the N-th byte in the received
data field (i.e. the last received datagram). N=0 is the first data byte,
after the UDP header (i.e. udp.rd[] can only access the data field, not the
various headers). To access the bytes in a datagram with an 8-byte data field,
N may run from 0 to 7 (!) . To avoid inconsistencies while reading multiple
bytes, the field will not be overwritten (by another received packet) until
the application clears the 'received' flag (see
udp.rcvd).udp[<channel>].rd.w[<N>]
: Almost the same as udp.rd.b, but reads the N-th 16-bit 'word' in little
endian byte order (aka "Intel" byte order), not just a single byte.
The result is an unsigned integer .udp[<channel>].rd.dw[<N>]
: Reads the N-th 32-bit 'doubleword' in little endian byte order (aka
"Intel" byte order). The result is an unsigned integer .udp[<channel>].rd.mw[<N>]
: Reads the N-th 16-bit 'word' in big endian byte order (aka
"Motorola" byte order). The result is an unsigned integer .udp[<channel>].rd.mdw[<N>]
: Reads the N-th 32-bit 'doubleword' in big endian byte order (aka
"Motorola" byte order). The result is an unsigned integer .udp[<channel>].rd.len
: Retrieves the length of the received data field, counted in bytes. Note
that, like the data field itself, this value will not change until your program
has signalled that it has 'finished' processing the received datagram by
formally setting
udp[<channel>].rcvd=0 .udp[<channel>].tcnt
: Interpreter function. Returns the number of successfully sent
(transmitted) UDP packets for this channel.
Examples: T.B.D. ...
Even though UDP may be considered a 'simple' protocol, getting it to work on a particular local area network (LAN) can be troublesome. For example, firewalls, Ethernet routers with different levels ( of complexity and difficulty ;-) can turn an easy task into a nightmare. This chapter contains a few notes by the software developer which may help you to get the UDP communications running.
The most valuable tool to debug network traffic (here: LAN, Ethernet) proved to be Wireshark; formerly known as Ethereal. Wireshark is a free, and possibly the world's best network protocol analyser. We strongly suggest you become familiar with this program; it can save hours of brainless "trial-and-error" debugging, especially if you don't know what's going on in your network, and 'where those packets get lost' between the sender and receiver.
Before starting a Wireshark capture, turn off the port number translation
: Edit -> Preferences... -> Name Resolution -> uncheck 'Enable transport
name resolution' .
Otherwise, (UDP-) port numbers (like 1235) would be replaced by some wildly
guessed names (like "mosaicsyssvc1"), which doesn't really help in most cases,
because 'our' port numbers are usually not what Wireshark thinks
they are. Don't forget to SAVE the modified Wireshark settings !
ToDo: Write a step-by-step introduction including....
After installing the programming tool, you will find an application named 'UPT_test.cvt' in the programming tool's "programs" folder (whereever the installer decided to place it..).
You can use this application as a first crude test for UDP communications. For a quick start (without any special hardware), we will first try to send a few UDP packets, using the programming tool's built-in simulator (note: The simulator uses the windows socket services, aka "winsock", and thus may behave completely different than the 'real' firmware).
In the tool's main menu, select File .. Load Program . Locate the programming tool's programs folder (not to be confused with the "windows" programs folder).
Once you got there, select the file UDP_test.cvt .
In the tool's main menu, select Reset. This resets the simulated terminal firmware, and switches from edit mode into simulator mode (like "Run !"). The simulated LCD screen should become visible, showing something similar as this screen:
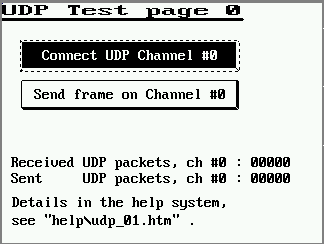
(Screenshot of the UDP test application)
Unfortunately, by default, the windows firewall doesn't seem to like UDP, so it will block any UDP traffic. With a bit of luck, windows will prompt you with a message like the following (here, when calling the udp.conn command from the UPT programming tool, i.e. from the simulator):
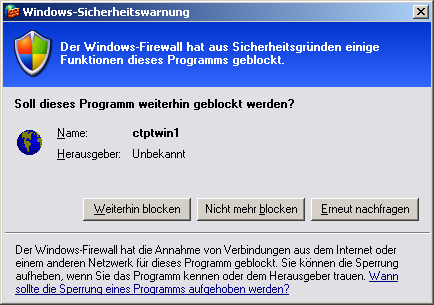
(Screenshot of windows firewall message saying
"Der Windows-Firewall (der Brandmauer?!) hat aus Sicherheitsgründen
einige Funktionen dieses Programms geblockt.",
which means (in English): "The windows firewall has blocked something for
security reasons." )
In most cases, you should be very suspicious if such a message pops up. But here, in this special case, we know the program 'ctptwin1' (= the CAN-Terminal Programming Tool for Windows) tried to communicate via UDP, so we allow (un-block) this function. (Sidenote: it would be extremely helpful if windows told us WHAT EXACTLY the blocked program tried to do, but hey, it's windows...). So, on a german PC, click on "Nicht mehr blocken" ("don't block.." (??) in English).
At this point, it's time to start Wireshark to see what's going on (on the local network).
Next, again in the UPT simulator screen, click on the programmed button labelled
| Send datagram on Channel #0 |
The (simulated) display application will now try to send a UDP packet to
some recipient, for simplicity with a hard-coded IP address 192.168.0.200
.
The IP protocol stack (in this case, the IP protocol under the hood of windows)
will try to resolve the Ethernet address first. That's the reason why, for
the very first step, we will not see a UDP packet in Wireshark (... that'd
be too easy ...) but something like the following:
| No. | Time | Source | Destination | Protocol | Info |
16 |
19.810005 |
CameoCom_08:01:e4 |
Broadcast |
ARP |
Who has 192.168.0.200? Tell 192.168.0.24 |
Here, the sender (PC running the UPT programming tool / simulator; Ethernet adapter made by "Cameo"?) had the local IP address 192.168.0.24 , and -to send an IP frame via Ethernet to the intended recipient- it needed to know the recipient's MAC address. This is what ARP (Address Resolution Protocol) is for. If all works well, 'someone' (whoever it is) with IP address 192.168.0.200 will answer the ARP request. The result should look similar to this (again, on the Wireshark screen):
| No. | Time | Source | Destination | Protocol | Info |
17 |
19.810177 |
IeeeRegi_8e:70:39 |
CameoCom_08:01:e4 |
ARP |
192.168.0.200 is at 00:50:c2:8e:70:39 |
... which means that the recipient (here: an MKT-View II with IP address 192.168.0.200 and MAC address 00:50:C2:8E:70:39) has answered the ARP request after about 1.7 microseconds, so the sender know knows which MAC address to use when trying to send the UDP packet - which happens in the next step: 18 192.168.0.200 UDP Source port: search-agent Destination port: mosaicsyssvc1
| No. | Time | Source | Destination | Protocol | Info |
18 |
19.810181 |
192.168.0.24 |
192.168.0.200 |
UDP |
Source port: 4096 Destination port: 4097 |
This means that we successfully sent the first UDP packet. But still things may go wrong. For example, in the next step, the recipient didn't have a matching UDP port opened, which caused the IP protocol to send a 'error message' as a response (in geek speak, ICMP):
| No. | Time | Source | Destination | Protocol | Info |
19 |
19.810451 |
192.168.0.200 |
192.168.0.24 |
ICMP |
Destination unreachable (Port unreachable) |
Thanks to Wireshark, you can check what's going on, know how to can fix it : If you can see the ICMP message, you know the recipient could be reached, so it's not a "hardware" problem but a problem with the port numbers.
If all works as planned, you will see the counter on the receiving terminal's LCD, labelled "Received UDP packets, Channel X" increases by one, each time you press the "Send.." button on the other devices. If you got this far: Congratulations, UDP seems to work properly in your network !
<ToDo: Complete this, especially what to do when things do not work as easily as described above >