
File Transfer Utility for programmable display terminals


Since 2010, certain display terminals made by MKT Systemtechnik are equipped
with a built-in file transfer server.
This document describes a simple file transfer utility, which is
integrated in some of MKT's terminal programming
tools.
If you prefer to upload your files without MKT's programming
tool, read the document titled 'ymodem' instead.
Hint: For devices with Ethernet and integrated web server, we strongly recommend to upload files to the device via web browser (using Firefox for example) ! File transfer via Ethernet-LAN (using TCP/IP, HTTP) is much faster than the old method (using CAN or RS-232) as explained in the rest of this document. Suitable devices with an embedded web server are MKT-View II / III / IV.
Contents
- Invocation of the file transfer utility
- The File Transfer Window (in the programming tool)
- Pseudo-directories in the remote device: data_flash, font_flash, audio_flash, memory_card, ramdisk, etc..
- Port Settings
- File Transfer via Ethernet (LAN) / UDP
- Appendix: Reason for the restriction to 8.3 "DOS"-filenames
Invocation of the File Transfer Utility
The file transfer utility can be launched from the programming tool's main menu under file (to get access to the terminal's root directory), or in the transfer menu (to transfer items like user defined fonts or wave audio files). This will open the file transfer window, which is explained in the next chapter.
Depending on the programmable device's configuration, you may have to switch
it into file transfer mode manually. But in most cases, the remote device
listens for the reception of file transfer commands on one of its communication
ports, which may be a serial interface (RS-232), USB with
virtual COM port,
CAN-bus, or
Ethernet / UDP/IP. You can select which of these
ports shall be tried for File Transfer in the programming tool's main menu,
under Transfer ... Connection Parameters .
Depending on the medium, other settings may be required in the
Settings menu
(sic!), for example the serial port's bitrate, CAN-"baudrate", the terminal's
node ID (for devices with CANopen protocol),
IP-address and (UDP-) port number (for devices
with Ethernet adapter and UDP/IP), etc.
The File Transfer window
The file transfer window contains two file lists. The left list, labelled
'Local:', shows files in a certain directory of your
local disk drive. The full directory path, and possibly a file mask (like
*.wav) is shown in an edit field above the file list. It can be modified
manually; the list will be updated when pressing the ENTER key in the path
field.
The right list, under 'Remote:', shows the current directory
of the remote storage medium (*), and all files currently found in that
directory. As for the "Local" file list, the path can be modified manually.
In addition, you can refresh the file list by clicking the 'Refresh' button
(icon with two circular arrows).
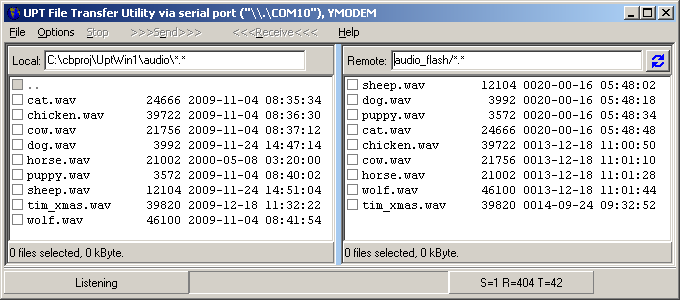
To change the current directory (on either the 'local' or the 'remote' drive), double click on any of the listed directory names. The names of directories (and pseudo-directories like "..") are grayed, have no sizes, and cannot be selected for transfer.
Normal files are listed by their DOS-compatible filename (8.3 format), followed by the file size in bytes, and the date and time of last modification in ISO 8601 notation (YYYY-MM-DD hh:mm:ss) .
Transferring files
To transfer files from your local drive to the remote device (e.g. to the programmable terminal), select all files you want to send by setting the checkmarks next to the filenames in the 'Local' list (left side). Then, select >>> Send >>> from the main menu (i.e. copy the selected files "from left to right").
To transfer files from the remote device your local drive, select all files you want to receive by setting the checkmarks in the 'Remote' list. Then, select <<< Receive <<< from the main menu (i.e. copy the selected files "from right to left").
By default, the file transfer utility uses the serial port ("COM x") and the XMODEM/YMODEM protocol, with a few proprietary extensions to retrieve the remote directory. If you seem to be unable to list the remote directory, or cannot send or receive filed, check the serial port settings as explained in a future chapter.
Pseudo-directories ("folders") in the remote device
Most of MKT's programmable devices don't really support subdirectories or
"folders". Despite that, you can switch the remote directory listing into
a (pseudo-) root directory by double-clicking the ".." entry in the listing.
The contents of the root directory listing depends on the hardware. It may
contain:
-
font_flash
This is another onboad FLASH memory chip (not a FLASH memory card) used to store user defined fonts (*.fnt), but it can be used to store a few other files, too.
The contents of the "font_flash" memory are not erased when updating the firmware, or uploading a new user application. Thus, it's a good place to store the boot-screen image, which usually shows a company logo immediately after power-on instead of the MKT-View's BIOS info.
-
audio_flash
Yet another onboard FLASH memory chip (not a FLASH memory card) used to store audio files (*.wav), but it can also be used to store a few other files.
Note: In a few devices which support audio output, but don't have an extra FLASH chip to store the digitized audio, the contents of the 'font_flash' and 'audio_flash' folder may physically be the same. Consequence: Deleting all files in the audio_flash folder may also delete the user defined fonts of such devices !
Files placed in this pseudo-directory can be played back using the interpreter command 'audio.play' . -
data_flash
This is an internal FLASH memory chip (not a FLASH memory card) used for internal data storage (display pages, imported bitmaps, etc).
Except for an upload of a single *.upt or *.cvt file (via a modified YMODEM-protocol), this directory is not accessable. -
memory_card
This pseudo-directory can be used to access the removable FLASH memory card. If this entry is missing in the pseudo root directory, the device (or firmware) doesn't support such a storage medium. The contents of the 'memory_card' folder will be empty if no card is inserted, or the card's file system is not supported. -
ramdisk
This pseudo-directory can be used to store temporary files, for example bitmap files which may be displayed on the screen without permanently saving them in FLASH memory.
To 'enter' one of these pseudo-folders, double click its name in the Remote Files list. To switch back to the root, double click the ".." item, or manually edit the current path in the edit field above the directory list.
The same system of pseudo-directories can also be used in some file-I/O-functions
(with "pseudo directory paths") of the
scripting language.
Port Settings
For the XMODEM / YMODEM protocol, using the serial port ("COM x" from the PC's point of view) as the transport medium. Other protocols and transport media like CAN or Ethernet may use different protocols for the file transfer.
To establish a connection, the File Transfer Utility uses the port specified on the tabsheet 'Settings' ('Einstellungen') in the programming tool's main window.
For the serial port, make sure the 'Serial Interface' is set to the COM port (or virtual COM port) to which the terminal is connected. Also, you will need to set the serial bitrate to the value used in the programmable terminal. For terminals with a "real" RS-232 interface, the default is 19200 bit/second. For devices with a built-in USB-to-Serial-Port adapter, the default is 115200 bit/second.
- A note on USB, which has always been a nuisance for developers:
-
Always connect the programmable terminal to the same USB plug on your PC.
Otherwise, Windows will always select a NEW COM PORT NUMBER which is very, very annoying.
If, for example, Windows decided to use "COM17" today, after using "COM10" yesterday, you will find something like the following in the combo list of serial ports:
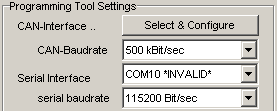
Furthermore, connect the terminal's "USB port" (which is in fact a virtual COM port) to the PC before starting the programming tool.
More details about USB and virtual COM ports are here .
File transfer via Ethernet (LAN) / UDP/IP
If the programmable device, and your PC, is equipped with an Ethernet port (and a suitable adapter cable is available to you), you can also transfer files via the local network. This is much faster than any other transfer medium, including the transfer via memory card (and the annoyance with USB memory card readers). Unfortunately, it may be tricky to establish a connection through the network, because like many other 'deeply embedded' devices, MKT's programmable devices use a static IP address. Furthermore, some other IP settings (like subnet mask, etc) may have to be modified in the programmable device to make it accessable in your local network.
The configuration of the programming tool (to use a LAN connection instead of CAN, or the serial port) is described here (same settings as for "Upload via Ethernet / LAN").
- Note:
-
If your local network uses a subnet mask of 255.255.255.0, and your PC has
a local IP address beginning with 192.168.0.XXX,
this configuration may be compatible with the default settings of most
of MKT's programmable devices. You can find out the device's static IP in
its 'Network Setup', which is accessable through the device's System Setup.
For example, if the display's static IP address is 192.168.0.243, you can
check if your PC can reach it in the local network (LAN) by entering the
following OS command (for example, on the windows command prompt : Start
-> Run: cmd) :
ping 192.168.0.243
-> output in the console window :
> Ping wird ausgeführt für 192.168.0.243 mit 32 Bytes Daten:
> Antwort von 192.168.0.243: Bytes=32 Zeit<1ms TTL=255
The UDP port used for file transfer is the same as for the CAN-via-UDP function. Typical network configurations (here: for the MKT-View II) are shown below.
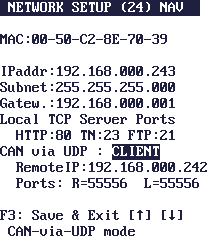
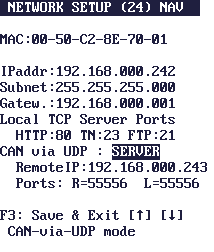
Details about the Network Setup in the MKT-View (2), and similar displays, can be found in document #85115 (System Menu and Setup) .
The configuration of the programming tool (to use Ethernet for the connection to the remote device) is described here ("Upload via Ethernet / UDP").
Details about CAN-via-UDP are in document #85140 (PDF, intended for developers, only available in english language) .
<To Be Continued>
- See also:
-
Overview , XMODEM /
YMODEM file transfer without MKT's programming tool ,
System Menu
,
USB-to-Serial Port Converter (Virtual COM Ports, troubleshooting hints),
File transfer via embedded web server (HTTP) .
Appendix
Reason for the restriction to 8.3 "DOS"- filenames
To avoid hassle with an army of overpaid patent agents, the embedded devices do not support long filenames ("LFN") -at least not on FAT file systems, which are used on most FAT-formatted memory cards. To read a deterrent story about a company who was sued for LFN patent infringement, search the web for "LFN long filenames" and "LFN Patent infringement lawsuit" (2009).
To make a long story short:
MKT's embedded devices (without an operating system) do not use LFN
on FAT file systems.
Furthermore, since FAT was still the dominating file system for FLASH memory
cards in 2009, the file transfer utility is also restricted to 'short' filenames,
i.e. up to 8 characters for the name, plus 3 characters for the extension.
Please remember this when creating your own files. Long filenames, or filenames
containing spaces, may be nice to have but the embedded device cannot handle
them.
Last modified:
2011-05-25