
Sample Applications for the User Programmable Terminal
![]()
![]() Rev. date: 2021-03-19 (YYYY-MM-DD)
Rev. date: 2021-03-19 (YYYY-MM-DD)
After installing the programming tool, there will be various examples for
different target systems on your local harddisk. If the tool was installed
into the recommended folder...
C:\MKT\CANdbTerminalProgTool,
(i.e. not in the windows-"Programs"-folder, whatever that may be in your country),
then the examples will be in these directories:
C:\MKT\CANdbTerminalProgTool
       |--- programs
       |      |--- MKTview2     : Sample applications for MKT-View II / III
       |      |      |            and similar devices with 480 * 272 pixel colour display
       |      |      |- MV2_Demo.cvt : Demo with touchscreen GUI, diagrams, etc
       |      |      '- ...
       |      |--- MKTview4     : Examples for MKT-View IV with 800 * 400 Pixel-Display
       |      |--- MKTview5     : Tests for "MKT-View V" prototypes mit CAN FD
       |      |--- script_demos : Examples for all devices with script language
       |      |
       |      | (Applications outside the above folders should run on any device
       |      |  with at least 320 * 240 pixels, due to the automatic scaling of
       |      |  display elements found in all devices produced since 2010)
       |      |
       |      |- analog_meter_test.cvt : Contains "needle instruments" in many forms
       |      |- diag_tst.cvt : Test application for 'diagrams'
       |      |- CdbSendT.cvt : Transmits signals defined in an imported database for CAN
       |      |- FontDemo.cvt : Shows various built-in fonts, including the older
       |      |                 bitmap fonts and freely scalable vector fonts.
       |      |- GPS_test.cvt : Test for GPS receivers / built-in NMEA parser.
       |      |-
Examples for MKT-View / MKT-View "+" (in a different file):
Examples for MKT-View II (and similar terminals with colour TFT and touchscreen):
- Accessing display elements through the interpreter (with a few screenshots)
- Using variable names as references (with a demo of a numeric keyboard using the touchscreen)
Examples for UPT515
- PDO functions: cnt, cyc, dat, id, rvc, trn, tx, mod, syn
- Example 1 : SDO channels , PDO channels, variables, Menus , Edit fields , Events
- Example 2 : special PDO functions, CAN error handling, Graphics , Text arrays
See also:
General Info about the UPT program examples
The examples in this chapter are presented in source code. Remember that you can modify your own UPT program file with a text editor, making it easier to "re-use" code from other applications. The examples presented in this document are contained in the installation archive of the programming tool. A few snippets from the examples are presented and explained later. Take your time to study an example completely, this document is intended to be read like a book (unlike the rest of the help system). The example files can be found in the UPT directory (programs\demo1.upt etc).
Note that this document was written when only terminals with CANopen functionality existed. Since 2002, there are also terminals without any CANopen functions (like "MKT-View" and "IPE-View"). If you use one of these "Non-CANopen"-terminals, skip some of the examples in this chapter - especially those dealing with SDO-channels, PDO-channels, remote I/O's, Nodeguarding etc.
But first, an overview of some UPT interpreter functions and procedures which are used in the examples.
UPT interpreter overview
If you don't have the UPT manual at hand, here are a few informations about the UPT's interpreter
The UPT's firmware includes an interpreter for numeric expressions, and for the execution of simple commands which may be required for special applications.
A few examples for numeric expressions:
- (Voltage * 100 ) / 230
- (Voltage > 230)
- (ce & kd0)
The interpreter tells variable names (which you define) from functions and command names by the first letter:
- An upper case letter is always the beginning of a variable name (like "Voltage")
- A lower case letter is always the beginning of a function or command name (like "kd0" or "out")
A complete list of all interpreter commands and functions can only be found in the UPT's Software Manual.
PDO function overview
The numeric interpreter has some built-in functions which can be used to access the PDO-Channels (part of CANopen). Some of these functions may be used for event definitions or as part of numeric expressions. Here is an overview of PDO commands, functions and links to examples where they are used. [N] is the array index for a PDO channel, the first channel has the index N=0 like in better programming languages.
- pdo[N].cnt
-
Returns the value of a counter. Use this function to find out how often a
particular PDO has been received or transmitted since power-on.
Used in: Example 2 .
- pdo[N].cyc
-
Returns the cycle time for the transmission of a PDO in milliseconds. You
can also assign a new TX cycle time for a PDO using a formal assignment like
this: pdo[0].cyc = 1234 .
The TX cycle is similar to the "PDO Event Timer" as described in CANopen DS301 V4.0, see object 0x1400 subindex 5.
Used in: Example 2 .
- pdo[N].dat[I]
-
Returns the current value of the [I]th data byte from PDO-channel N. You
will usually connect a variable to a PDO to extract one or more data bytes
from the PDO's data field (so you usually do not need this function, only
for "very special" cases !). You can also modify a single byte in a TX-PDO
using a formal assignment like this: pdo[0].dat[7] = 123 (this only makes
sense if no variable is mapped into this PDO-data-byte).
- pdo[N].id
-
Returns the current CAN identifier used for a PDO.
You can also set a new CAN identifier for a PDO using a formal assignment like this: pdo[0].id = 2047. BUT YOU SHOULD BE EXTREMELY CAREFUL WITH THIS BECAUSE THE UPT'S INTERPRETER DOES NOT VERIFY AT RUN-TIME IF A VALID CAN-ID IS USED.
Used in: Example 2 .
- pdo[N].rcv
-
This numeric function checks if a PDO telegram has been received since the
last function call.
The flag will be reset internally by reading it. This function is intended to be used in event definitions only. This function can be used for "watch" or "guarding"-purposes.
- pdo[N].trn
-
This numeric function checks if a PDO telegram has been transmitted since
the last function call.
The flag will be reset internally by reading it. This function should be used in event definitions only.
- pdo[N].tx
-
This is not a numeric function, but a procedure. It initiates the transmission
of a PDO by the interpreter (if the NMT state is OPERATIONAL). Use it if
you want to transmit an event-driven PDO (for example, on a key etc).
Used in: Example 2 .
- pdo[N].mod
-
This numeric function checks if a PDO telegram has been modified and not
yet transmitted.
Returns: TRUE = The PDO's data-field has been modified but not been transmitted yet
FALSE= The PDO's data-field has not been modified since the last transmission.
- pdo[N].syn
- This numeric function returns the count of SYNC intervals of a paricular PDO channel since its last transmission (or evaluation). This counter is internally required for CANopen-Transmission-Types 2..241. See DS301 for more information.
Example 1
The file demo1.upt demonstrates
- defining SDO channels , defining PDO channels (only for terminals with CANopen functionality)
- connecting variables to remote I/O's (only for terminals with CANopen functionality)
- displaying menus , edit fields
- defining events and reactions
It was designed for the "UPT515" with 128*64 pixels, but it also works on larger UPT's like the "UPT167" with 320*240 pixels.
Example 1.1: Defining SDO channels
In demo1.upt, two SDO channels are defined to communicate with remote CANopen devices. The UPT acts as client, the remote devices as servers. The definition in the UPT program looks like this in the example:
; ------- SDO client channels --------------------

; sc = CAN-identifier server->client

; cs = CAN-identifier client->server

c0 sc=1410,cs=1538

c1 sc=1411,cs=1539
This can be defined with the UPT programming tool on the channels tab. For CANopen devices, the following CAN-identifiers are often used (as so-called "pre-defined connection set"):
SDO(server->client) : CAN-Identifier = (1408+node-ID) = 1409...1535
SDO(client->server) : CAN-Identifier = (1536+node-ID) = 1537..1663
where <node-ID> can often be set by DIP-switch etc, in the range
1..127.
Example 1 communicates with Node 1 and Node 2 in a CANopen network.
Example 1.2: Defining PDO channels
Here two PDO channels (process data objects) are defined to communicate with remote CANopen devices. Usually the UPT is the receiver, the remote devices is the transmitter.
-
The definition in the UPT source code looks like this: -
; ------- PDO channels ---------------------------

    ; pr = CAN-identifier PDO

    ; fl = Flags

    ; tt = Transmission Type

    ; td = Transmission Direction

    ; cy = Cycle Time

    c10 pr=385,fl=0,tt=1,td=1,cy=1000

    c11 pr=386,fl=0,tt=0,td=1,cy=100

    c12 pr=387,fl=0,tt=0,td=2,cy=500

    c13 pr=388,fl=1,tt=1,td=2,cy=0
The PDO channels can be defined with the UPT programming tool on the
channels tab (where the numeric values for the transmission type and
direction are explained, seen from the UPT's point of view: td=1 means "RX",
td=2 means "TX"). For CANopen devices, the following CAN-identifiers are
often used (as so-called "pre-defined connection set"), seen from the CANopen
device's point of view:
PDO1(tx) : CAN-Identifier = (384+node-ID) = 385...511

PDO1(rx) : CAN-Identifier = (512+node-ID) = 513...639

PDO2(tx) : CAN-Identifier = (640+node-ID) = 641...767

PDO2(rx) : CAN-Identifier = (768+node-ID) = 769...895
All CAN-Identifiers here are decimal values. Note that "tx/rx" in this table has to be seen from the I/O-devices point of view, so the "tx" PDO's are transmitted by an I/O-module and can be received by the UPT. The possible values for node-IDs are 1..127. Simple devices like I/O-Modules often use a DIP switch to set the node-ID.
Back to some PDO channels in this example:
- Channel 10, which is defined as
-
c10 pr=385,fl=0,tt=1,td=1,cy=1000
is a normal (mappable) PDO-Channel with the CAN-Identifier 385, which will be synchronously (tt=1) received (td=1) by the UPT. For synchronously received PDO channels, the cycle time is not important. - Channel 12, which is defined as
-
c12 pr=387,fl=0,tt=0,td=2,cy=500
is a normal PDO channel with CAN-Identifier 387, which will be periodically but asynchronously (tt=0) transmitted (td=2) by the UPT every 500 milliseconds (cy=500).
A few notes on PDO channels, if you are not familiar with CANopen:
- unlike an SDO, a PDO channel is always a one-way-street (not bidirectional)
- unlike an SDO, a PDO channel can be transmitted to more than one receiver. In other terms, a PDO transmission can be a broadcast.
- for both SDO and PDO, a CAN-Identifier must be unique in a network. A particular CAN-Identifier must never be used by more than one decive for transmission. It's like a system of FM radio transmitters: On a single frequency (~CAN-ID), there can only be one transmitter but many receivers. If two transmitters use the same frequency, they jam each other and no message will reach the receivers.
Example 1.3: Connecting variables to remote I/O's
After the communication channels have been defined, it's time to do something with them. In demo1.upt, a few variables are connected from the UPT to the "outside world" via communication channels. The list of variables in an UPT program file looks like this (a bit lengthy, the comments are generated automatically, it helps the experienced user who uses a text editor) :
-
; ------- Variable declarations ------------------

    ; vn = Variable Name

    ; ut = Update Timer reload value

    ; fl = FLags

    ; dt = canopen-Data Type

    ; ar = canopen-Access Rights

    ; dv = default value (if not zero)

    ; mi = minimum value

    ; ma = maximum value

    ; sf = scaling factor (if not one)

    ; sd = scaling divisor(if not zero)

    ; so = scaling offset (if not zero)

    ; ch = CHannel (0..9=SDO, 10..n=PDO)

    ; in = canopen-INdex (SDO)

    ; su = canopen-SUbindex (SDO)

    ; nb = Number of Bits (PDO)

    ; fb = First Bit number (PDO)

    v
    vn="AnOut1",ut=10,dv=10101,mi=-32767,ma=32767,fl=0,dt=3,ar=2,ch=1,in=25617,su=1

    v
    vn="AnOut2",ut=10,dv=20202,mi=-32767,ma=32767,fl=0,dt=3,ar=2,ch=1,in=25617,su=2

    v vn="DigIn",ut=20,ma=255,fl=0,dt=5,ar=1,ch=10,nb=8,fb=0

    v vn="DigIn2",ut=30,ma=255,fl=0,dt=5,ar=1,ch=10,nb=8,fb=8

    ; ... something removed here ...

    v
    vn="X",ut=0,mi=-32768,ma=32768,fl=0,dt=4,ar=1,ch=255,nb=1,fb=48
The last line in this excerpt defines a variable (X) which is not connected to any channel (ch=255), so it can be used internally to save temporary values inside the terminal.
Variable AnOut1 is connected to a remote I/O-module via SDO
(CANopen!), the definition
-
v
    vn="AnOut1",ut=10,dv=10101,mi=-32767,ma=32767,fl=0,dt=3,ar=2,ch=1,in=25617,su=1
looks like this in the UPT programming tool:

- Note: Index 0x6411 is 25617 in decimal form. This object is described as followed in CiA DS401 :
- Object 6411H writes the value to the output channel 'n' (unconverted). Value is 16 bits wide or less. The value is always left adjusted.
To write UPT applications for CANopen networks, you must know what these objects are. For example, DS401 defines the Device Profile for I/O Modules. There are other DS's (or DSP's) available for motion control etc from www.can-cia.de, the problem is you must be a CIA-member for full access on theis website.
Example 1.4: Creating a Menu Page
To create a menu, put a few display lines on a display page and define them as "menu lines" as follows (with the programming tool, there is a checkmark somewhere on the display line's property panel). On the simulator screen, such a page can looks like this:
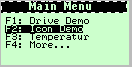
The source code for this page is:
-
p0 pn="MainMenu",fl=0,fc=7,bc=0

    d fn=3,dm=5,ba=2,vn="",fs=" Main Menu "

    d xp=4,yp=16,ba=0,vn="c\"DriveDem\"",ar=59,fl=2,fs="F1: Drive Demo"

    d xp=4,yp=24,ba=0,vn="c\"IconDemo\"",ar=60,fl=2,fs="F2: Icon Demo"

    d xp=4,yp=32,ba=0,vn="c\"Thermo\"",ar=61,fl=2,fs="F3: Temperatur"

    d xp=4,yp=40,ba=0,vn="g\"AuxMenu\"",ar=62,fl=2,fs="F4: More..."
The page header (with pn="MainMenu" = page name) defines some general properties of a page. Four display lines in this example are defined as menu lines (with "fl=2"), F1..F4 are used as hotkey definitions ("ar=59..62" are the hotkey codes for a menu item; in normal edit fields "ar=xx" would define the access rights). This allows the user to select an item with the cursor and ENTER key, the same way he selects an edit field.
An important part of a menu is the definition of "what shall be done if the user selects the menu". This is defined in the code above as a single interpreter command, usually "call" or "goto" another page (abbreviated as "c" and "g" in the code sample, followed by the name of the new display page).
A few notes on UPT menus:
- In previous UPT versions, "events" and "reactions" were used to build a menu, since there were no dedicated menu lines.
- To look at the source code of a display page without a text editor, switch to the page definition tab ("Page #x"), go to "Other Commands" and set the checkmark for "Show all types of commands".
- To control the menu state and the current "menu item" yourself (instead of letting the user do it with the keyboard), use the "mm" (menu mode) and "mi" (menu item) commands of the interpreter. This will be explained in another example.
Example 1.5: Using Edit Fields
To display or modify a value, you can use an edit field for a numeric variables(!). A display page with edit fields can look like this:
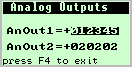
Note: In this screenshot, the edit field for AnOut1 is completely
selected, to show that the page is in navigation mode. If a cell is
in edit mode, only a single character will be selected.
To create an edit field with the programming tool, select the variable to be edited from a list on the display line property panel, and enter a few placeholders for the digits in the Text field (which is used as a format string here). Use the '*' character for digits, and the '-' character where the sign shall appear.
The source code for displaying the example page is this (generated by the UPT programming tool) :
-
p2 pn="AnalgOut",fl=0,fc=7,bc=0

    d xp=1,yp=1,fn=3,dm=5,vn="",ar=1,fs=" Analog Outputs "

    d xp=5,yp=26,fn=4,vn="AnOut1",ar=1,fl=1,fs="AnOut1=+******"

    d xp=5,yp=42,fn=4,vn="AnOut2",ar=1,fs="AnOut2=+******"

    d yp=56,ba=0,vn="r",ar=62,fl=2,fs="press F4 to exit"
The definition of a display line with an edit field contains:
- xp, yp (X- and Y-position)
- Define where the line appears on the display.
- fn (Font Number)
- Defines which font shall be used.
- ba (Base)
- Usually 10 for "decimal numbers", 2 for "binary" or 16 for "hexadecimal". If the base is 10, this parameter is not contained in the definition string (to save a few bytes).
- vn (Variable Name)
- Name of a variable (expressions or functions are not allowed here)
- ar (Access Rights)
- If the field shall be editable, the variable must be Read/Write (ar=1) or Write only (ar=2), but not Read-Only (ar=0). If the definition of the edit field's access rights is different from the variable's definition, a warning message appears on the display line property panel.
- fl (FLags)
-
Can be used to define if the value shall be written back to the output channel
while editing (fl=1). The "fl"-value is a bit-combination of the checkmarks
on the display line property panel of the programming tool. If
AnOut1was connected to a light dimmer, setting "fl=1" makes sense because you would immediately notice the effect while pressing the cursor up/down key. Otherwise, the brightness would change after pressing RETURN (or a similar key) on the terminal's keypad. - fs (Format String)
- Contains leading and trailing text and some placeholders for the displayed value, like "*" for a digit, "-" for the sign etc.
Some notes on edit fields:
- If the base number is 0 (zero) instead of 10, the value will be displayed in decimal format but the cursor will always jump to the lowest decimal position. Incrementing or decrementing is then only possible by "one". May be useful in applications where only small steps shall be allowed, like revolution speeds of motors etc.
- The default state of the edit fields when switching from one page to another is "off". If you want to change this, you can switch the mode between "off" / "navigate" / "edit" with the interpreter command "mm" (menu mode), which was originally only used to switch the menu mode between "off"(0) and "navigate"(1), but it also works for edit fields. To do this only once, use the PageEnter event which will be explained in the next chapter.
- There is no real difference between an edit field and a display field for numeric values. A display field is just an edit field which cannot be edited ;-) because of the access right Read-Only.
Example 1.6: Defining Events and Reactions
To implement special behaviour in an UPT application, you can define events and reactions. They are periodically evaluated (several times per second, depending on the CPU power). Event definitions are similar like "if"-statements in some programming languages, the Reaction def's are are executed if the "if"-condition is TRUE (which means the result of the event-expression is not zero here). Events and reaction methods are defined either local on a display page or global.
This simple example uses events and reactions to..
- write keyboard codes through a communication channel to an external device (like a dumb terminal)
- shows the last keyboard code on the terminal screen
- demonstates the usage of timer functions
Load the file "demo1.upt", then switch to this page...
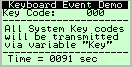
- The UPT source code for this page is:
-
p7 pn="Keys",fl=0,fc=7,bc=0

    d fn=2,dm=5,ba=0,vn="",fs=" Keyboard Event Demo "

    d yp=8,fn=2,ba=0,vn="Key",fs="Key Code: ***"

    d yp=16,fn=2,ba=0,vn="",fs="---------------------"

    d xp=2,yp=24,fn=2,ba=0,vn="",fs="All System Key codes"

    d xp=2,yp=32,fn=2,ba=0,vn="",fs="will be transmitted"

    d xp=2,yp=40,fn=2,ba=0,vn="",fs="via variable \"Key\""

    d yp=48,fn=2,ba=0,vn="",fs="---------------------"

    d xp=5,yp=54,fn=2,ba=0,vn="X",fs="Time = **** sec"

    e ev="kh",re="@Key=kc"

    e ev="(Key!=0)&&(Key.od)",re="@Key=0"

    e ev="pe",re="ts0(10):@X=0"

    e ev="t0",re="ts0(10):@X=X+1"
The source code lines beginning with "e" are the Event (ev) and Reaction (re) definitions. Their function here this:
- whenever a key is hit (ev="kh"), the key-code is taken from the keyboard buffer and assigned to the variable "Key"
- after the value of "Key" has been successfully sent to a communication channel, the variable "Key" will be set to zero again
- after entering this display page (ev="pe"), a timer is started to run for 1.0 seconds, and the variable "X" is set to zero
- when the timer expires (ev="t0"), the timer is started again for 1 second, and the variable "X" is incremented.
What can this example be used for ? You can connect the UPT to a host which
processes all keystrokes and uses the UPT as a simple terminal. Because we
have connected Key to an SDO channel, the host will receive
a CANopen-compatible SDO Write Request. After the host has handled
the key, it will answer with an SDO Write Response to the UPT, which
will then trigger the second event to reset the value of "Key" (this is required
for the host to detect multiple presses of the same key). Try yourself to
modify this example so that "Key=0" will be sent to the host when the user
has released the key - look at the keyboard function overview.
Sorry there is no link to the manual in this document, because the
UPT manual is still in HLP format while this example file is already written
in HTML code.
Example 2
The second example (file "demo2.upt") is a bit more complicated than the first, because it uses a lot of the UPT interpreter's special functions. It demonstrates...
- Global events
- special PDO functions
- CAN error handling using a global event definition
- Pixel Plot Demo
- UPT System Test (for onboard digital I/O etc)
- Text Array Demo
This example was designed for the "UPT515" with 128*64 pixels, but it also works on larger UPT's like the "UPT320" with 320*240 pixels.
Example 2.1: Global Events
<<overview of example2 next example >>
In demo2, a few global events are defined for some of the following explanations. Switch to the Global Events-tab of the UPT programming tool, where you should see something like this:
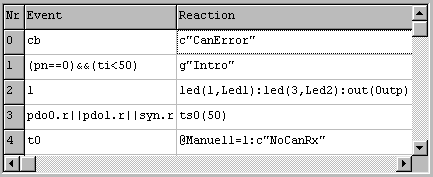
What do the events in this example do ?
-
"
cb" checks if the CAN-controller is in a BUS-OFF condition. If so, the UPT calls(!) the pageCanError -
"
(pn==0)&&(ti<50)" checks if the current page is "0" (which is always the case after power-on) AND less than 5 seconds have elapsed since power-on. If this is true, the UPT goes to(!) a page namedIntro. This can be used to display a company logo (on page 0) for a short time after power-on. -
"1" is always true, so the Reaction in this line will always be executed (as often as possible). This may steal a lot of CPU power, if the Reaction command(s) are time-consuming. Remember this, if your UPT application runs too slow... see notes below
-
"
pdo0.r || pdo1.r || syn.r" occurrs when the UPT has received something on the first or second PDO channel, or the SYNC telegram. The Reaction "ts0(50)" starts a timer for an interval of 5 seconds. -
"
t0" occurrs when the first timer expires. In this example, this will happen if no PDO or SYNC has been received for 5 seconds (see previous event definition). It is a kind of "programmed CAN-Bus watchdog". In the reaction for this event, a flag is set (Manuell=1) and a page namedNoCanRxis called(!). A call to a page allows to return to the page which was active before the call (unlike "goto").
General notes on global events:
-
keep the number of global events as low as possible, because their periodic evaluation takes a lot of time, especially if you use a terminal with a slow 8-bit CPU like the UPT515.
-
Don't define the same event in the global event table and on a page's local event table, because this will cause unreliable program behaviour. Reason: Some event-functions have side effects, for example the "kb"-function remove a keystroke from the internal keyboard buffer. (BTW this is another reason to use a text editor. It allows you to search all event event definitions quickly in the complete sourcecode)
Example 2.2: Special PDO functions
<<previous example next example >>
In demo2, special interpreter commands and functions are used to control
a PDO apart from the possibilies of the PDO definition table.
You can see how to..
-
Change a PDO's CAN-Identifier during runtime
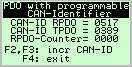
- Code:
-
p18 pn="PdoIds",fl=0,fc=7,bc=0

     (... some lines removed ...)

    e
    ev="kb1",re="pdo[0].id=pdo[0].id+1"

    e ev="kb2",re="pdo[3].id=pdo[3].id+1"

    e ev="kb3",re="g\"PdoMenu\"
-
Event-driven Transmission of a PDO-channel
- Code:
-
p17 pn="PdoEvt",fl=0,fc=7,bc=0

    d fn=3,dm=5,ba=2,vn="",fs=" Event-driven TPDO"

    d
    xp=6,yp=22,fn=3,ba=0,vn="pdo[3].cnt",ar=1,fl=4,fs="TX\-Count
    = *****"

    d xp=28,yp=45,ba=0,vn="",fl=4,fs="F3: transmit"

    d xp=28,yp=54,ba=0,vn="",fl=4,fs="F4: exit"

    e ev="pe",re="pdo[3].cyc=0"

    e ev="kb2",re="pdo[3].tx"

    e ev="kb3",re="g\"PdoMenu\""
Notes:
- the cyclic PDO transmission is disabled in the PageEnter event (pe) by setting the cycle time to zero.
- The event "kb2" checks if function key F3(!) is pressed (all kinds of indices start with zero, not one like in Pascal).
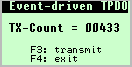
Example 2.3: CAN error handling using a "global event" definition
<<previous example next example >>
After carefully going through the previous examples, look at this page from demo2:

This page is called, when the CAN-controller goes into bus-off (as defined in a global event, see table above). The status flags of the controller are displayed as binary value. The operator can press F1 (or "OK") to reset the CAN-controller after fixing the network problem, which is usually a wrong baudrate, a bad termination resistor etc.
- The UPT source code of this display page is:
-
p9 pn="CanError",fl=1,fc=7,bc=0

    d xp=1,yp=1,fn=3,dm=8,vn="",fs=" CAN-Bus Offline !"

    d yp=25,ba=2,vn="cs",fs="CANstatus = %********"

    d xp=3,yp=38,fn=3,ba=0,vn="",fs="press F1 to reset"

    d xp=5,yp=55,fn=1,ba=0,vn="",fs="\iF_ok,kd0 \iF_stop,kd3"

    e ev="kd0",re="cr"

    e ev="(!cb)",re="r"
Notes:
- The event "kd0" occurrs when F1(!) is pressed. The reaction "cr" tries to reset the CAN-controller, to resolve the CAN-BUS-Off condition. Because resetting the CAN-controller is quite delicate, do this only after some user interaction, not automatically !
- The event "(!cb)" checks if the CAN-Controller is not(!) in BUS-Off-State. If so, the program returns to the page which was visible before this "CanError" page was called. In this example, we use this to return to normal operation only if the CAN-Bus-Off-state has been resolved.
- A CAN-BUS-OFF-state is a serious problem, which will never happen if the network is really healty. In your own application, you should display something like "Call Service Team under phone number XYZ" or whatever.
-
The format string in the bottom display line contains an icon drawing sequence
("
\iF_ok,kd0"), which only works on displays with graphic capabilities.
"F_ok" is the name of an icon. The sequence ",kd0" tells the interpreter to invert the icon as long as the first(!) function key is pressed.
Example 2.4: Pixel Plot demo
<<previous example next example >>
This example show some of the UPT's graphic routines. It plots a curve like a slow oscilloscope with a grid overlay. To understand this example completely, you must be familiar with event definitions and the syntax of the UPT's command interpreter.
![]()
- The UPT source code for this page is:
-
p8 pn="Plotter",fl=0,fc=7,bc=0

    d xp=1,yp=48,fn=1,vn="X",fs="X=+***"

    d xp=1,yp=55,fn=1,vn="Y",fs="Y=+***"

    d fn=2,dm=5,ba=2,vn="",fs=" Pixel Plot Demo "

    g cm="@X=(X+1)"

    g cm="@Y=(ti%64)-32"

    g cm="dm(0):pi(X,lim(32-Y,10,62))"

    e ev="kd3",re="g\"MainMenu\""

    e ev="(((X+1)&7)==0)",re="dm(0):ic(PlGrid1,(X+1)&127,8)"

    e ev="(X>127)",re="@X=0"
The "g" lines are visible in the UPT programming tool on the "Other
Commands" tab of a page definition. It was once used only for
graphic commands, but can also be used to execute other commands,
like the assign command (@) in this example. It is not very
clever to use the page update rate as a timebase for the X-axis of this primitive
plotter, but it keeps the example simple. The line
g cm="dm(0):pi(X,lim(32-Y,10,62))"
sets the draw mode to "normal", and plots a single pixel to the screen. The
Y-coordinate is limited to a valid screen area for the UPT515 (only 64 pixels
high). The source for the Y-position is a sawtooth generated from the UPT's
system timer ("@Y=(ti%64)-32"), you may assign something else
here (for example the value from a temperature sensor etc).
The raster grid is drawn with an icon command (ic), executed every 8 pixels
along the X-axis, in an event reaction. This also erases the old curve.
When the X-position exceeds the right display margin (X>127), it is
automatically set to zero. The UPT's CPU is too slow for a nice scroll routine,
so the next scan of the plot will simply overwrite the old image.
Example 2.5: System Test demo
<<previous example next example >>
This example demonstates a few other special interpreter functions. The page looks like this in the UPT simulator (for 128*64 pixel displays):
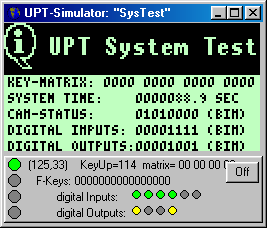
The program only runs on a UPT515 with onboard digital input/outputs. On other terminals, the commands to access the onboard digital I/O are ignored.
- The UPT source code of this page is:
-
p14 pn="SysTest",fl=1,fc=7,bc=0

    g cm="dm(0):fi(0,0,127,25,$FF,$FF)"

    d dm=5,ba=0,vn="",fs="\iS_info"

    d xp=22,yp=7,fn=3,dm=5,ba=2,vn="",fs="UPT System Test"

    d xp=1,yp=27,fn=1,ba=2,vn="km",fs="KEY\-MATRIX: **** **** **** ****"

    d xp=1,yp=35,fn=1,vn="ti",fs="SYSTEM TIME: *******.* SEC"

    d xp=1,yp=43,fn=1,ba=2,vn="cs",fs="CAN\-STATUS: ******** (BIN)"

    d xp=1,yp=59,fn=1,ba=2,vn="out",fs="DIGITAL OUTPUTS:******** (BIN)"

    d xp=1,yp=51,fn=1,ba=2,vn="inp",fs="DIGITAL INPUTS: ******** (BIN)"

    e ev="kb3",re="out(out^$08)"

    e ev="kb2",re="out(out^$04)"

    e ev="kb1",re="out(out^$02)"

    e ev="kb0",re="out(out^$01)"
The black title of this page is realized with a graphic command line. The Fill-command ("fi") fills a rectangular area with a certain fill pattern, here: $FF,$FF for a solid block. The "Info"-icon is drawn afterwards, otherwise it would be hidden under the black rectangle.
The four event definitions on this page are used to toggle the digital outputs with the keys F1..F4. The "out"-function reads the current port state. The bitwise EXOR-operator inverts one bit. After that, the "out"-command(!) writes the new value back to the port.
In the UPT simulator window, you can see the state of the digital I/O ports. The digital inputs (green) can be toggled by clicking at them.
Example 2.6: Text Array demo
This example shows the use of text arrays. Text arrays can be used to convert numeric values like error codes into text messages on the display. The demo looks like this:
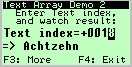
- The UPT source code for this example is:
-
p10 pn="TextDe2",fl=0,fc=7,bc=0

    d xp=1,fn=2,dm=5,ba=2,vn="",fs="Text Array Demo 2 "

    d xp=13,yp=8,fn=2,ba=0,vn="",fs="Enter Text index,"

    d xp=13,yp=16,ba=0,vn="",fs="and watch result:"

    d xp=1,yp=27,fn=3,vn="X",ar=1,fs="Text index=+****"

    d yp=40,fn=3,ba=0,vn="sa[X]",fl=4,fs="=> ***************"

    d xp=76,yp=55,ba=0,vn="g\"MainMenu\"",ar=62,fl=2,fs="F4: Exit"

    d xp=1,yp=55,ba=0,vn="g\"TextDe3\"",ar=61,fl=2,fs="F3: More"
- The source section with the text array is somewhere else in demo2 :
-
; ------- Message Strings ------------------------(etc ... up to 1024 text messages are possible)
; ur = user reference number
; ms = message string
s0 ur=0,ms=". . . . . . . . ."
s1 ur=1,ms="Eins"
s2 ur=2,ms="Zwei"
s3 ur=3,ms="Drei"
s4 ur=4,ms="Vier"
s5 ur=5,ms="Fuenf"
This example displays one of the message strings using the
sa[]-function which returns the text for a given array index.
The array index itself can be entered in a numeric input field, connected
to variable "X" in this example. For a real application, X may be an error
code in the range 0..1023, connected to a sensor or PLC via SDO or PDO.
There are other text array examples in demo2 which address the text array not by the array index, but the "user reference number". This is more flexible (arbitrary 16-bit numbers can be used) but much slower, because the complete text array must be scanned to find the user reference number.
- The code for such an example would be:
-
d xp=13,yp=8,fn=2,ba=0,vn="",fs="Enter Text ref-nr,"

    d xp=13,yp=16,ba=0,vn="",fs="and watch result:"

    d xp=3,yp=28,fn=3,vn="X",ar=1,fs="Reference # ****"

    d yp=39,fn=3,ba=0,vn="sr[X]",fl=4,fs="=> ***************"
Example 3
Examples 3 does not exists yet (busy from other tasks :-)
Planned:
- Accessing the real-time clock
- Color demos
top